User guide
GUI layout
The GUI (Graphical User-Interface) consists of 3 main elements:
- project buttons
- work area
- log area (console output)
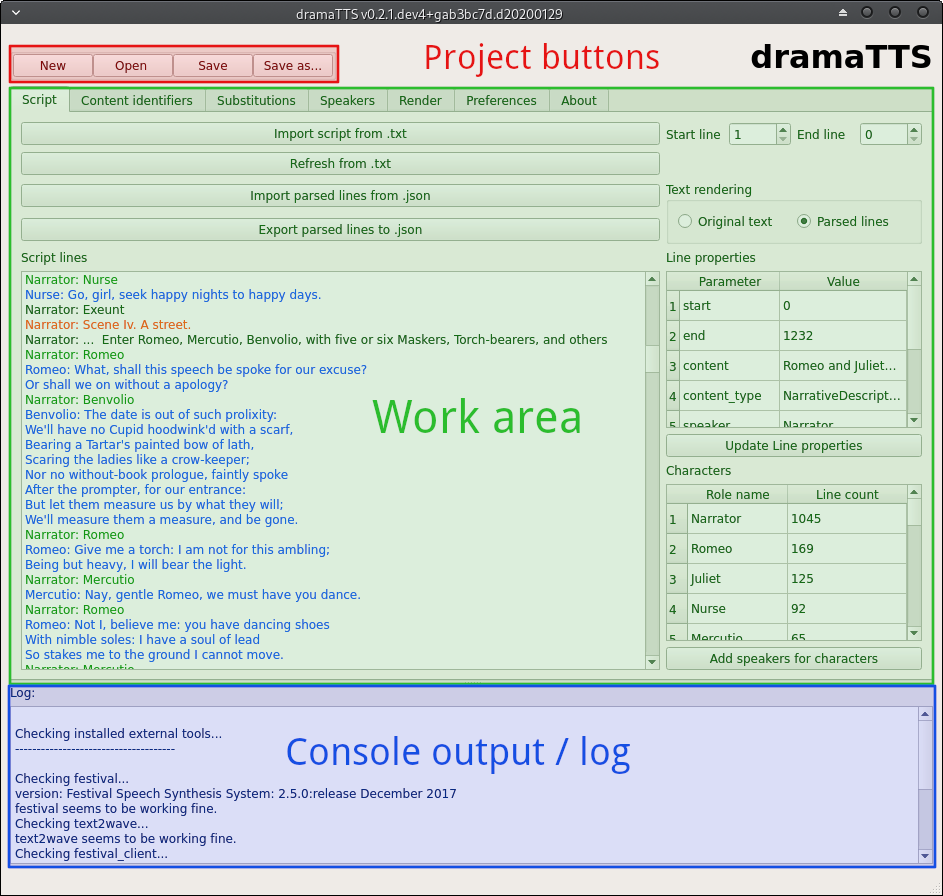
Project buttons
The project buttons will always be shown on top and allow to create a new project, open a saved project or save a project at any time.
Work area
The work area contains the tabs for the different work steps - e.g. for importing and viewing a script, defining options for the audio rendering, etc.
The individual tabs will be explained in more detail in the chapters below.
Log
The log shows the console output of the dramaTTS sub processes. It can provide valuable information like warning and error messages or the progress of the rendering process.
Input format basics
Although dramaTTS allows to configure the behavior of the script parser to support different formatting styles of the text source, it will always distinguish 5 different categories of content:
- An indicator for a new scene (content type ‘SceneTitle’)
- an indicator for a dialogue - which will be subdivided into:
- a speaker name which starts the dialogue (‘DialogueIndicator’)
- lines of dialgue (‘DialogueContent’)
- comments inside a dialgoue (‘InlineComment’)
- narrative description (‘NarrativeDescription’)
These types of content shall be illustrated based on the default dramaTTS format. Note, that this behavior can be adjusted (see Working with “Content identifiers”).
SceneTitle
A new scene is typically indicated by a single line with a scene number and a scene title text. In the default format each line starting with a number followed by a dot is assumed to indicate a new scene - e.g.:
23. A new sceneScene titles will be read by the narrator.
Dialogue
A dialogue is typically indicated by a line giving only the speaker name, followed by dialogue content, which is terminated by e.g. the next double line break. In the default formatting a text section is assumed be a dialogue, if a line consisting only of UPPER CASE letters (for the speaker name) is encountered. The dialogue will end after the second blank line is encountered - e.g.:
BOB

Hi, I am Bob and this line is the my dialogue.
This line is part of my dialogue as well. (sighs) I guess it's time to end my dialogue now.

Bob's dialogue was terminated by the second an empty line, which makes this line belong to the narrator.
The parser will first identify the complete dialogue and then start to search for the ‘DialogueIndicator’ and ‘InlineComments’ within the dialogue. In the default formatting the ‘DialogueIndicator’ is defined by a single line with only UPPER CASE letters (i.e. the first part of the identifier for the complete dialogue) and ‘InlineComment’s are defined by any words encapsulated in parenthesis. Thus the parser will interpret the example above as follows:
- DialogueIndicator (read by the Narrator)
- BOB
- DialogueContent (read by the speaker - in this case BOB)
- Hi, I am Bob and this line is the my dialogue. This line is part of my dialogue as well.
- InlineComment (read by the Narrator)
- (sighs)
- DialogueContent (read by BOB again)
- I guess it’s time to end my dialogue now.
NarrativeDescription
Everything, that the parser did not identify as being a ‘SceneTitle’ or any part of ‘Dialogue’ will be assigned to the content type ‘NarrativeDescription’ and be read by the narrator - e.g. the last line in the example above.
Handling text files
If your script/text file is in accordance with the default dramaTTS format, you can go direcly to the “Script” tab and start importing your text file.

The script tab provides a viewer for the imported script, a table which displays the properties of each line (or more precisely each paragraph), an overview of the characters found in the script (including their line counts) and a couple of buttons for import/export.
View script parser results
The script lines viewer shows the result of the import. It uses color highlighting to distinguish the different types of content:
- black: Narrative descriptions (NarrativeDescription)
- red: New scene indicator (SceneTitle)
- green: A speaker name - i.e. a dialogue indicator (DialogueIndicator)
- blue: Text of a dialogue line (DialogueContent)
- purple: A narrator comment inside a dialogue - e.g. “he turns to …” (InlineComment)
Note that you can switch the text rendering mode between “Original text” and “Parsed lines”. The “Parsed lines” option basically puts the name of the speaker at the beginning of each line.
If you click on a line in the viewer you can find more details on it in the “Line properties” table (see below).
Line properties table
The line properties table shows details on the properties of the selected line/paragraph including the content type (as described above), the start and end position in the text file, the scene the line belongs to, the speaker of the line,…
You can also modify the line properties by changing the property values in the table and clicking the “Update Line properties” button.
Warning
If you re-import your script the changes made to the line properties will be lost. Thus this option should only be used as a final step in your editing process. A better solution to introduce changes (if you do not want to modify the source text directly) is to use the options explained in the Working with “Content identifiers” or Substitutions chapters.
Characters table
The characters table gives an overview of the characters/roles identified by the script parser. The characters are sorted according to their line count.
If you click the “Add speakers for characters” button, a new speaker (with the default speaker settings - see Adjust program preferences) will be added for each character which does not already have speaker settings defined.
Importing and exporting parsed lines
To start a new project you would usually “Import a script from .txt” - i.e. a plain text source. dramaTTS also allows to export and import the parsed lines (JSON-format).
Note
Importing/exporting the parsed lines is usually not required as the same information is stored inside the project file as well.
The “Refresh from .txt” button comes handy, if you have already imported a text file and either made modifications to the text file directly or to the content identifiers (see Working with “Content identifiers”) or substitutions (see Substitutions). Pressing the button will re-import the text file (applying the current parser configurations).
Working with “Content identifiers”
“Content identifiers” can adjust the behavior of the script parser.
The content identifiers are RegEx (Regular Expressions) patterns, which are used to identify a text section - 4 types of identifiers are defined:
- SceneTitle
- Dialogue
- SpeakerName
- InlineComment.
Note
The identifier ‘SpeakerName’ is used to assign the content type ‘DialogueIndicator’. These names will most likely be harmonized in a future version.
The behavior of the content identifiers was already explained in the Input format basics chapter. The list below shows the order of events within the text process.
- Perform substitutions - see Substitutions
- Search and extract SceneTitle contents
- Search and extract Dialogue contents - this is the complete dialogue including the speaker name (SpeakerName), and dialog lines (including InlineComments)
- Within each Dialogue it will extract the DialogueIndicator as defined by the SpeakerName pattern and split it from the rest of the Dialogue
- In the remaining part of the Dialogue it will search for InlineComments and assign positive matches as InlineComment and text parts not matched as DialogueContent
Content identifiers can be configured in the “Content identifiers” tab.
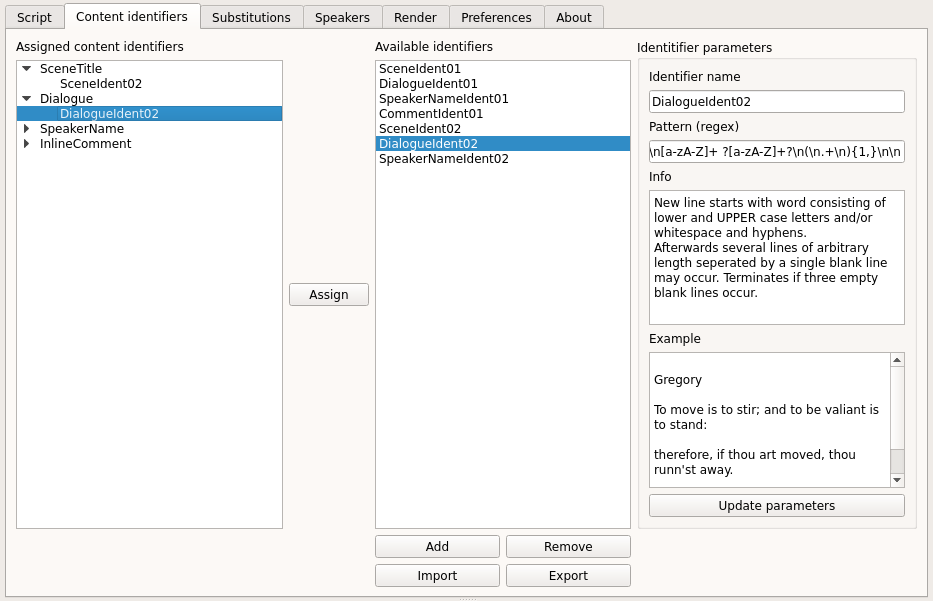
The “content identifiers” tab basically consists of a tree view for the “assigned identifiers”, a list of “available identifiers” and an explanation of the selected “identifier”.
Assign content identifiers
The “Assigned content identifiers” view shows which content identifier has been selected for the different types of content in the current project. You can change the assigned identifiers by selecting the identifier type in the tree-view + an available identifier from the list and clicking the “Assign” button.
Browse available content identifiers
The “Available identifiers” list shows all content identifiers available. You can use the buttons below to add new identifiers, remove identifiers and import or export the complete list of identifiers.
Note
Changes made to the content identifiers will not persist through the sessions. In order to use a custom content identifier in a different project you should export the identifiers and import them to the new project. Content identifiers configurations are also stored in the project files.
Identifier parameters
Identifier parameters are shown to explain how the content identifiers work. To explain how the RegEx patterns works the “info” and an “example” field is available.
If you create your own identifiers you should always add an example. When pressing the “Update parameters” button dramaTTS will perform a check, to see if your example is matched by the RegEx and display the result in the log.
Note
Although lots of different formats can be identified using (more or less complex) identifiers, the process still relies on having consistency throughout the text document and being “machine” distinguishable. E.g. if a speaker name (as a DialogueIndicator) and a narrative comment share the format (“\nBob Miller\n” vs. “\nEnter Bob\n” - where \n denotes a line break) the defined Regex might find “false” matches. Hence in some cases it makes sense make some changes to the document before importing or use substitutions (see Substitutions) to define some replacements (e.g. you could add some special characters to common director instructions like “Enter …” to distinguish them from character names)
Substitutions
Substitutions provide the possibility to replace words in the text before the script parser is started. Substitutions can be defined in the “Substitutions” tab.
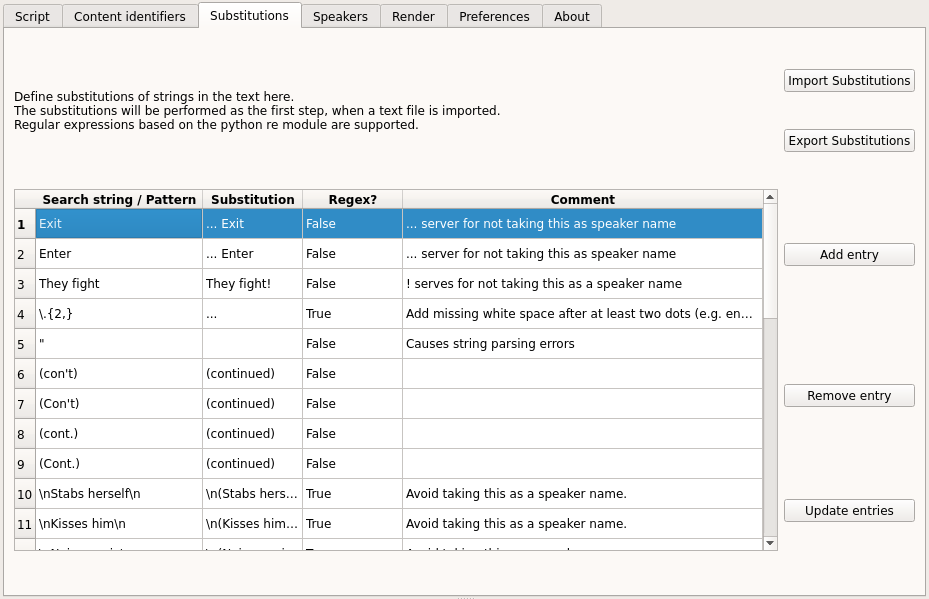
The substitutions consist either of a simple search text or a RegEx pattern. In both cases a substitution text has to be defined as a replacement.
Defined substitutions in the table can be modified and saved by clicking the “Update entries” button. The “Add entry” and “Remove entry” buttons can be used to extend the list or remove the selected substitution. Substitutions can also be exported and imported to a json-file to be shared between projects. You can also define a default substitutions file, which is loaded on startup - see Adjust program preferences.
Configure speakers
In order to give a character a distinctive voice, you will have to define its speaker settings. Speakers can be added, modified and ex- or imported in the “Speakers” tab.
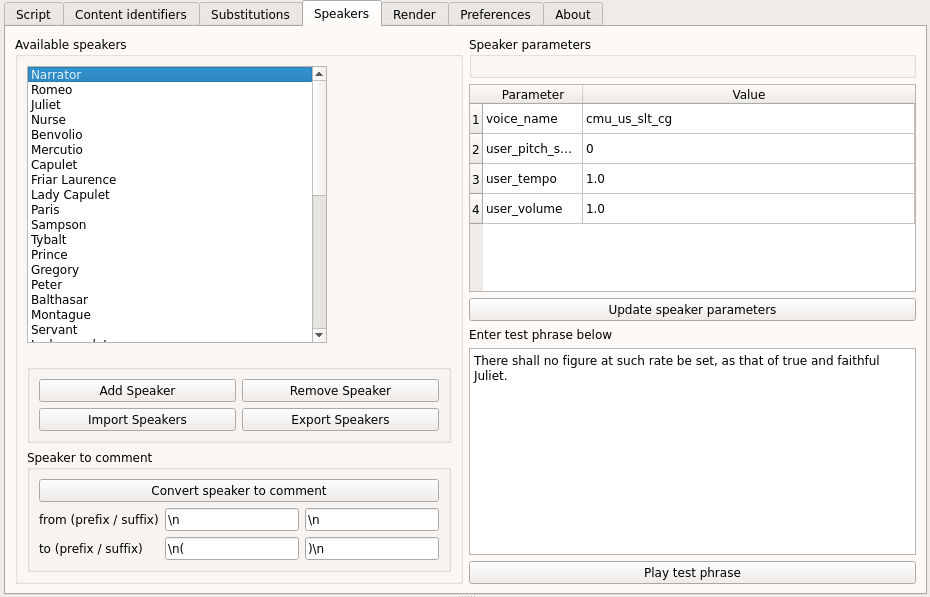
Browsing, adding and removing speakers
The list box in the top left corner shows the defined speakers (if you have clicked the “Add speakers” button in the script tab - you should see all characters defined in the play here). With the buttons below the speaker list speakers can be removed or new speakers can be added.
Note
The speaker name must match the character name (case sensitive) - see also characters table in Characters table. Lines of a character, who does not have a speaker defined, will be read by the “Narrator”.
You can also export and import the speaker definition’s.
Speaker parameters
The speaker parameters table shows the parameters (voice name, pitch, tempo and volume) for the selected speaker. You can change the parameters and use “Update speaker parameters” button to save the changes.
Note
Although you can define the volume for each speaker to compensate differences in the loudness of individual voices, a more convenient way is to select the “normalize audio” option (see Render audio), which will automatically adjust the volume in the rendered audio files to a predefined dB-level.
Play a test phrase
Below the speaker parameters you have a text field to define a test phrase. By clicking on the “Play test phrase” button the test phrase will be rendered with the currently defined speaker parameters.
Note
Rendering the test phrase may take a while for long test phrases and of course you need festival and SoX being installed and correctly configured (check the console output on start-up or see Render audio).
Convert a speaker to a comment
The “speaker to comment” button allows to automatically add a substitution for the selected speaker name. This can be useful, if a line has mistakenly been identified as a speaker name. E.g. in the example below a text line containing only the word “Retires” has been identified as a speaker and been added by the “Add speakers” method (since it matches the identifier for a speaker name).
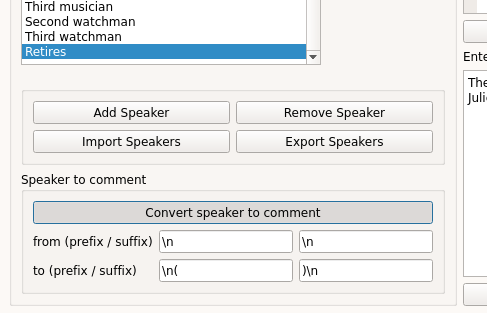
By selecting the wrong “speaker” and clicking on the “Convert speaker to comment” button, the “speaker” will be removed from the speaker list and simultaneously a substitution will be created by pre-/appending the prefixes/suffixes to the search and substitution string will be added to the substitutions list - in the example above this will result in:

If the script is now re-imported “(Retires)” will not be treated as a speaker (assuming that Speaker names do not allow parenthesis in this case).
Render audio
To render the script to audio files go to the “Render” tab. Here you can configure the options for the audio renderer and start the rendering process.
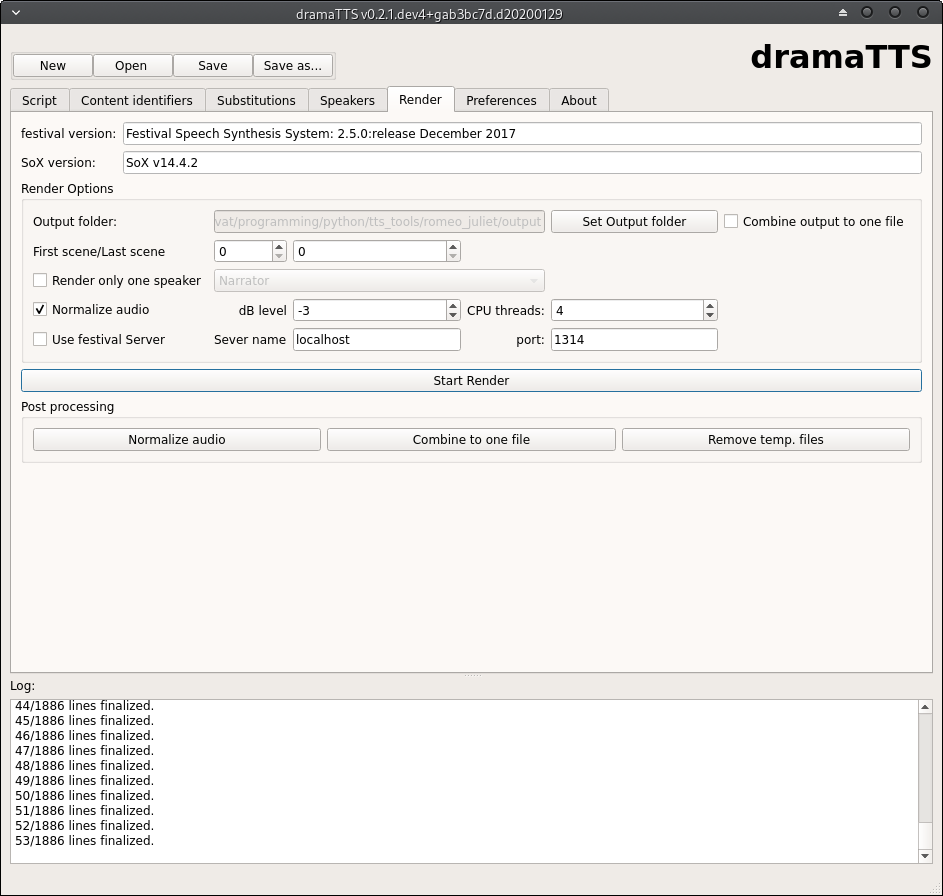
The render tab also shows, if the festival and SoX applications are configured correctly. If true, you will see the version number of the applications displayed in the text boxes on the top.
Following options can be defined for the audio renderer:
Output files and folders
Before you start rendering it is mandatory to define an output folder to store the generated wave-files.
Inside the output folder dramaTTS will create a sub-folder for each scene - called “scene_XXX” (where XXX will be replaced with the scene numbers e.g. “scene_003”).
In the rendering process a wave-file for each line/paragraph will be created. The wave-files will be named “scene_XXX_line_YYY.wav” - e.g. “scene_003_line_002.wav”. After having rendered all lines of all scenes the individual wav-files will be merged to a single wave file for each scene - i.e. at the end of the rendering process you will see e.g. a “scene_003.wav” in the output-folder.
Note
After the render is completed you will actually have the recording in two versions - a) the scene files and b) the individual line files in scene sub-folders. You can of course delete the scene sub-folders - however this will prevent certain post-processing and corrective actions (see below) - so it is recommended to keep the files in the sub-folders as long as you plan to make modifications to the project.
Configure render options
Combine output to one file
This option will - additionally to the scene and line files - create a single wave-file for the whole play, which will be stored on the same level as the output-folder and also have the name of the output-folder appended by a “.wav”
First scene/last scene spin boxes
With these spin boxes you can limit the rendering process to a certain range of scenes - e.g. useful if you found a mistake in a specific scene and do not want to render the complete script again.
Note
Regarding the first scene
If the first line in the text source is not a ‘SceneTitle’, dramaTTS will create a new scene named “Preface” and assign all text up to the first SceneTitle to this scene (scene number 0). In this case the first real scene in the text would actually be scene number 1. This situation is the most common scenario.
If however the text starts directly with a SceneTitle, then this first real scene will be scene number 0.
Regarding the last scene
Consider the numbering issues mentioned above as well. Setting the last scene to 0 means to render from the start scene to the end of the play.
Render only one speaker
If the “Render only one speaker” option is checked you may select any of the characters found in the play and only the lines belonging to this character will rendered. This is useful, if you are unhappy with the rendered audio output of a specific speaker and want re-rendering the lines of the speaker with adjusted speaker settings. This option can also be used in combination with the scene range limiter described above.
Note
If you want to use this option to re-render the lines of a specific speaker, you must not delete the individual line wave files in the scene sub-folders. After having re-rendered the lines of a specific speaker all scene files will be re-build as well.
Normalize audio & dB level
If this option is checked the individual line files will automatically be normalized to the dB level defined by the dB level spin box.
Note
You can also normalize the files as a post-processing step (see below).
CPU threads
dramaTTS supports multi-processing for rendering the audio output, which can significantly reduce render times. In order to achieve fast render times you should select as many threads as (virtual) CPU cores you can spare.
Render times can vary significantly depending on your system, the length of the text and the voices used. To render a complete typical drama/screen play script with the default voices a core i5 CPU running on 4 threads might easily require 1-2 hours of render time.
Use festival server
The festival application can also work in a client-server mode - see the festival documentation [1] for details.
Note
If this option is selected dramaTTS will assume, that a festival server is running on the specified hostname (which can also be an IP-address) and port. To use server option the festival_client application has to be configured correctly - see Adjust program preferences.
Starting and stopping the render process
The “Start render” button starts the rendering process.
The progress of the rendering process will be displayed in the log.
When you press the “Cancel Render” button the program will cancel all lines, which have not yet been scheduled for rendering. However the currently running threads will not be killed immediately. The program will wait until they have finished their rendering tasks, which might take a while. A status message about the remaining running threads will be shown in the log.
Post processing
dramaTTS currently only supports limited post-processing options.
The “normalize audio” and “combine to one file” buttons will perform the same actions as described for the corresponding render options above.
The “remove temp. files” deletes the line wave files. Note that this prevents further post-processing and re-rendering strategies.
Adjust program preferences
The preferences tab provides some configuration options and default settings.
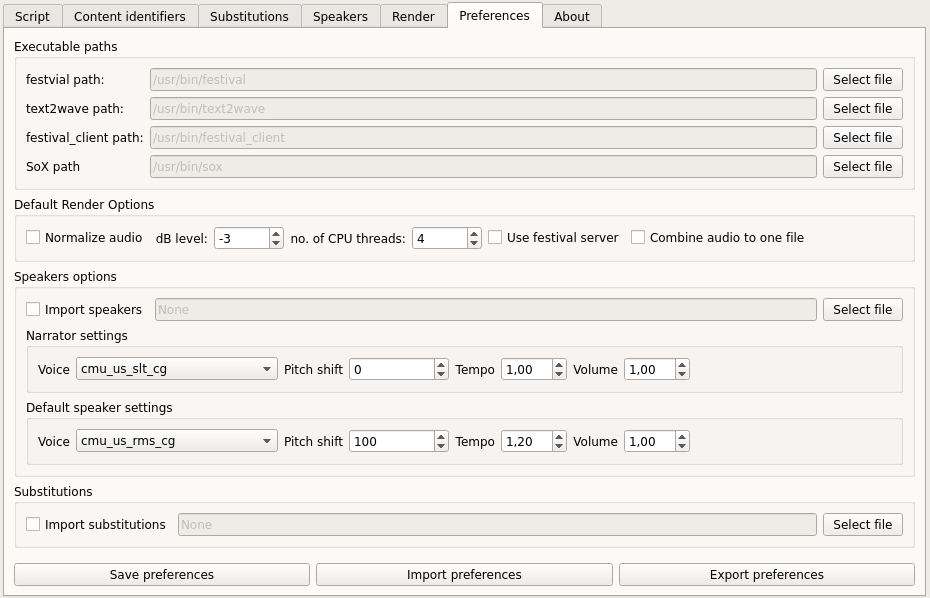
Executable paths
Here you can defined the path to the required external applications for audio rendering - i.e. festival and its components (text2wave and the festival_client script) and SoX.
If the tools are added to your system PATH, dramaTTS should be able to determine the file locations automatically.
Default render options
For some render settings presets can be defined, which will be used when creating a new project (for details on the meaning of these options see the Render audio chapter).
Speaker options
If you check the “Import speakers” option, you can define a file with exported speaker settings, which will be imported on start-up.
You can also define the default configuration for the “Narrator” and the “default speaker”. The “default speaker” defines the initial speaker settings, when a speaker is added (via the “Add speakers” or “Add speaker” buttons).
Substitutions
Analogous to the “Import speakers” option above, but for substitutions.
With the “Save preferences” button you can save the current preferences to dramaTTS’s config file (which is located in the current users home folder and named “.dramatts_config.json” - if you can’t find it, you might need to change your file browsers view settings to show hidden files).
You can also export and import the preferences to another file.
| [1] | http://www.cstr.ed.ac.uk/projects/festival/manual/festival_28.html#SEC129 |